By Debbie Arrington
Guest Writer
It’s going to be a long, hot summer. Maybe the time is right to finally ditch your lawn.
But how to begin?
Let that heat be your helper. Summer sun can speed up an easy method of turf removal: Sheet mulching.
“Creating a water-wise landscape can be intimidating,” notes Joanna Solins, Environmental Horticulture Advisor for the UC Cooperative Extension in Sacramento, Solano and Yolo counties. “I think that sheet mulching provides an approachable option for some people, as it’s possible to DIY.”
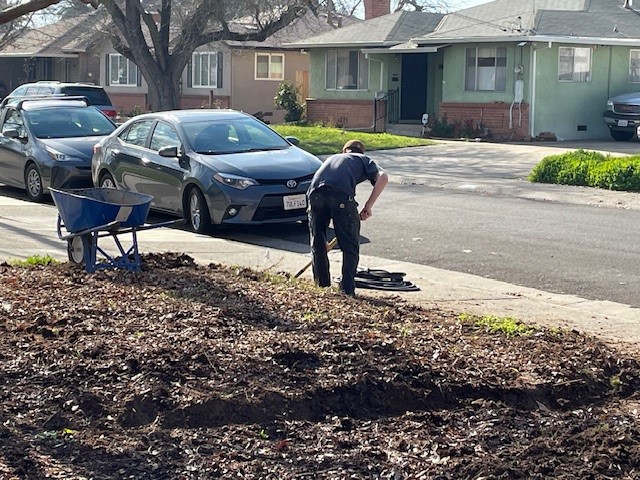
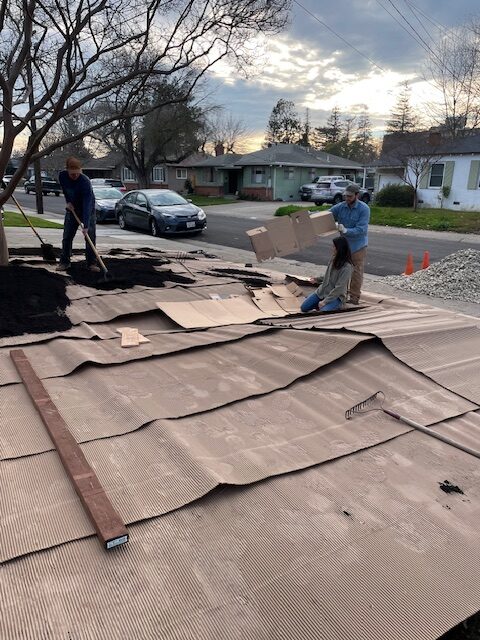
Sheet mulching is a technique that layers compost, mulch and weed barriers (such as cardboard) on top of the turf. These layers smother the lawn, which eventually breaks down in place. When it comes time to plant, holes are poked through the layers.
“I recommend doing it in the spring or summer,” says Ryan Burnett, Interim Manager for the City of West Sacramento’s Environmental Services and Sustainability Division. “Once it’s in place, the summer heat comes and you get solarization help. It’s not only covered, but the grass that’s there is getting baked.”
To entice customers to try sheet mulching, the City of West Sacramento offers a “Lawn Begone” voucher worth up to $300 towards compost and mulch. In less than a year, the program has paid vouchers for the removal of up to 27,000 square feet of lawn. Other water providers offer similar programs or rebates.
“The voucher program gets people started,” Burnett says. “It’s a big undertaking to go from grass to a full California water-wise landscape. Do the first stage, which is just covering (the turf).”
 With sheet mulching, there’s no sod cutting, no loss of top soil and a lot less waste.
“One big benefit of sheet mulching: You’re not digging things up,” Burnett says. “Ripping out a lawn needs heavy equipment; it gets very expensive. Once it’s ripped out, where are you going to put it? You’re removing your topsoil, too.”
Leaving the lawn where it is to decompose not only solves that waste issue, but keeps a lid on weed seeds lurking underneath the turf.
“I like that sheet mulching can be low cost and low waste,” Solins says. “The major known benefits of sheet mulching are that the turf stays in place and breaks down instead of being removed and taken to the landfill, and that it is possible to carry out a full landscape transformation on a small budget and without necessarily using the help of professional landscapers.
“Anecdotally, sheet mulching can be an effective method for replacing lawns, and I think it’s a very promising technique,” she says, adding that more research is needed. Solins plans to research how sheet mulching may benefit the soil and how it compares to other lawn removal techniques.
“There are a lot of conflicting instructions for sheet mulching that could be confusing for people, and there is currently no research-based information on what works best,” she notes.
 Burnett used sheet mulching at his own West Sacramento home to eliminate Bermudagrass lawns in both his front and backyards. He estimated his new water-wise landscape uses “10 times less water” than the former lawns and requires a lot less work.
“Back when I had lawns, I was out there two, three hours every weekend, mowing and trimming if I wanted them to look decent,” Burnett recalls. “Now, I can go two or three weeks without weeding or other yard work. There’s some maintenance but definitely much less than before.”
His experience also taught him how not to sheet mulch.
“When you do it the wrong way, it’s the worst of both worlds,” he says. “If you put the mulch right on top of the grass with no other barriers (such as cardboard or weed cloth), within two weeks, it will be a real mess with the grass and mulch all mixed together. It doesn’t kill the grass; it feeds it.”
Solins adds, “I think some of the worst drawbacks are seen when people don’t put enough mulch on or wait to mulch. The cardboard shows through and looks very messy, and won’t effectively kill the turf.”
Burnett offers these additional tips:
- Mow the lawn to be removed as short as possible.
- Dig a 6-inch trench around the edges of the area. “That’s where the grass is going to grow back first,” he says. Use the trench to anchor the edges of the cardboard, weed cloth or other weed barrier.
- Shut off irrigation to the area being sheet mulched. Cap the sprinklers and convert them to drip. If you’re going to do this later, remember to mark the sprinkler locations with flags or stakes so you can find them under the layers.
For more tips: https://sacmg.ucanr.edu/Beyond_Lawn/.
Make ‘lawn lasagna’
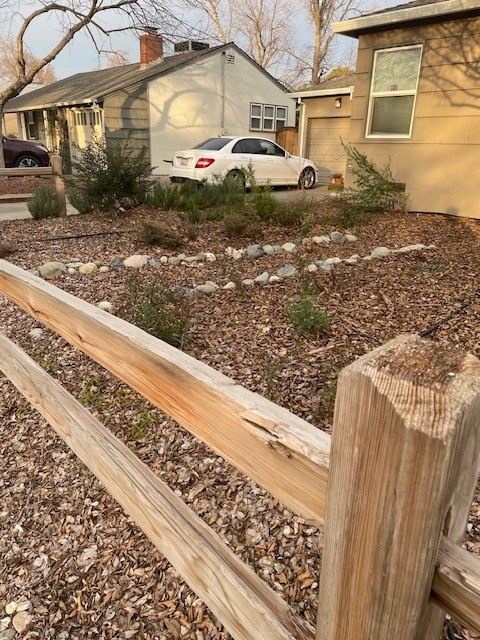 Sheet mulching is a great way to convert lawn or other flat landscape areas into healthy garden space. Its layers earned this method the nickname “lawn lasagna”; like horizontal composting, those layers “cook” down in time.
This method also maintains soil moisture, which is critical for both microorganisms and future plants. When ready, plant right through the layers – no tilling necessary.
In the Sacramento area, sheet mulching can be started in early summer or fall. Starting in summer makes use of our abundant heat to speed the decomposition process. When started in fall, autumn leaves can be used as one or more of the layers and winter rain will keep the layers moist (another plus).
One small space can be done at a time — or do the whole lawn. To make your own lawn lasagna, follow these steps for each area of turf to be removed:
- Mow the lawn as short as possible. Leave clippings in place.
- Water by hand. Really give the area a deep soaking.
- Cover with weed barrier such as two or three layers of cardboard, builders paper or several thicknesses of newsprint (no glossy paper). Overlap the edges 4 to 6 inches.
- Thoroughly wet the cardboard or newsprint.
- Cover with 1-inch layer of steer or horse manure or compost. Water lightly.
- Cover with a 2-inch layer of dried leaves, straw, shredded newsprint or other dried or “brown” material. Water lightly.
- Cover with a 1-inch layer of “green” material, such as more manure, lawn clippings, garden trimmings or vegetable scraps. Cut green ingredients into 2-inch pieces or smaller. Water lightly.
- Layer more browns and greens until the area is under at least 8 to 12 inches of material. Water lightly after each layer. Finish with a brown layer such as wood chips.
- Water only occasionally as needed; compost needs moisture to break down. Expect this step to take three to four months or more. Areas that are sheet mulched in June will be ready to plant in fall.
- No turning is necessary; plant directly through layers.
———————————————————————————————————————————-
Debbie Arrington is a longtime home and garden reporter and co-author of the blog Sacramento Digs Gardening: https://sacdigsgardening.californialocal.com/